

Becoming an Adhesive Pro
If you’ve been with us a while, you know the key to getting that amazing 7+ day hold is the proper use of your liquid gold: the Adhesive! Let’s take a dive into some trouble shooting tips and tricks to getting the most out of your precious little tube!
Achieving the Perfect Adhesive Application
The most crucial part of your DIY lash application is the amount of adhesive you use. As the adhesive starts to dry and become tacky in texture, it will also get slightly smaller in size. This makes it very important to take the time to build that 3D bubble of adhesive so you know you have enough! Once the adhesive bubble has been placed on your WinkClique lash segment, make sure to wait the recommended time to allow it to become tacky, about 3-5 minutes. This time can very slightly from an older bottle to a new bottle and if you live in a more humid climate or not. The key to knowing if your adhesive is ready, is if you feel the lashes are sliding around while trying to place the segment. If this is happening, gently take off your lash segment, allow it to sit for an additional minute and try again! The tacky texture will be what makes the lashes stick to your natural lashes so make sure to wait before you apply! If you feel the corners lifting prematurely, making sure to add more adhesive to the most inner and outer corner segments. This will give just the boost your corners need to hold through the full 7+ days!
Avoiding Excessive Tackiness
After you’ve placed your at home lash extensions, do you ever feel that your adhesive feels extra tacky? While our adhesive is made to remain slightly tacky in consistency through the wear of your lashes, it should not feel too tacky. If the lash segments are placed too close to the waterline during application, this will cause your eye to create more moisture which makes the adhesive never fully set to the correct consistency. Make sure to apply your WinkClique lashes 1-2mm away from your waterline during application making sure to avoid this issue.
Maximizing Adhesive Efficiency
To maximize the benefits of this precious bottle, make sure to shake it vigorously before each use and keep the lid on nice and tight between each use. If you have some adhesive that has spilled out onto the threads of your bottle, it is typically due to an air bubble getting caught inside. When this happens, shake the bottle really well and dip the wand in and out of your bottle a few times causing the air bubbles to break up. If you experience an excessive amount of spillage on your bottle we recommend using a baby wipe to clean it up and remember, keep that lid on tight!
Understanding Adhesive Shelf Life
The life of your adhesive is about 2 lash books with constant use, or about 2 months. When your bottle is exposed to oxygen, it changes the viscosity of the product making it thicker over time, thus starting the clock for the life of your bottle. So if you’ve opened a bottle a few times but then left it on the counter for over 2 months, it would be best to purchase a new bottle! The shelf life of an unopened bottle is 12 months.
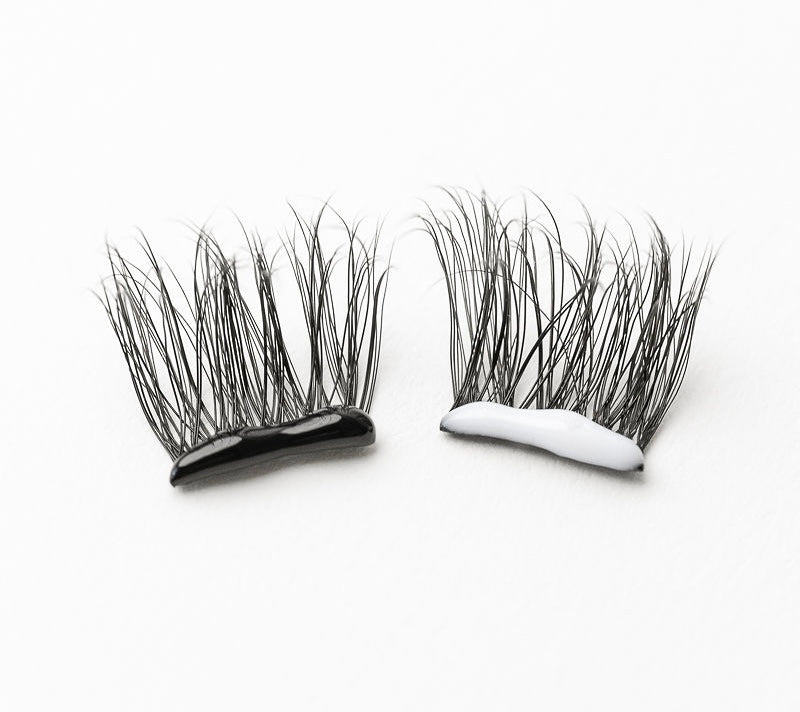
Clear or Black
Clear or Black Adhesive, which is better? Because both of our adhesives are made with the same formula, it is all based on personal preference! If you would rather a more natural look to the base of your WinkClique lashes or you are new to at home lash extensions, the Clear is best. Because the Clear is easy to see when placing on the black cotton band, this helps you create that beautiful 3D bubble for our first timers! If you would like a little boost of thickness to the base of your DIY lashes almost creating an eyeliner effect, Black is the one for you! We have dedicated Clique members on both teams so you can’t go wrong with either one!
Lashes and Water Activities
Are you getting ready to head to the pool, lake, or beach this summer and wonder if your WinkClique lashes can keep up? The short answer is, YES! With the right amount of adhesive during application, and some aftercare once your lashes are wet, you will be able to keep that salon-quality look through all of our summer events! The biggest key is to make sure you place enough adhesive on each segment during application. When you do get your lashes wet, do not touch them! This will allow the adhesive to dry back down to the correct consistency. Once your do it your self lash extensions have air dried, use your Lash Presser to seal them to your natural lashes again making them look as good as new!
By understanding the details of adhesive use—such as the importance of building a proper 3D bubble, allowing adequate drying time, and avoiding placement too close to the waterline—you can ensure a secure and comfortable fit for up to 7 days or more. Following these tips and tricks, you’ll be well on your way to mastering the art of DIY lash extensions and enjoying their beauty and convenience to the fullest.
Read more
Mothers wear many hats such as, caregivers, teachers, counselors, and are often the backbone of the family. They juggle countless tasks with grace and resilience, from cooking meals to offering emo...

With the temperatures rising and outdoor activities at an all time high, we get asked a lot if WinkClique lashes are waterproof. We are here to tell you, the answer is, ABSOLUTELY!Because water is ...